
Word Practice 4

Here is a video demonstrating the skills in this practice. Please note it does not exactly match the instructions:
Complete the following Practice Activity and submit your completed project.

For Word Practice 4, we will use Word to create a cover letter to accompany your resume that you created in Word Practice 3. Key skills in this practice are creating a letterhead, finding and replacing text, drag and drop, table styles, editing and checking your document.
- Start Word and display a new blank document. Display the formatting marks and rulers.
- Save the file as Yourlastname_Yourfirstname_Word_Practice_4 in your Word folder.
- Type the following, pressing Enter once after each line.
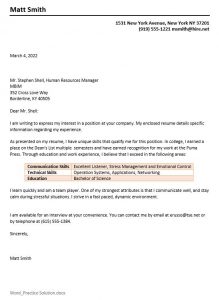
Matt Smith
1531 New York Avenue, New York NY 37201
(919) 555-1221 msmith@hire.net
- Select the name Matt Smith and change the font to 18 and apply bold.
- Select the second and third paragraphs that contain the address, and contact information. Change the font to 12, apply bold, and Align right.
- With the second and third paragraphs selected, change the line spacing options to single, and check the box to do not add a space between paragraphs of the same style.
- Click in the first paragraph with the name, and insert a solid 2 ¼ pt. single line border below the paragraph. To launch the borders and shading dialog box, go to the home tab, paragraph group, click the arrow next to the borders icon, and launch borders and shading at the bottom of the list.
- Using Document Info, add the file name to the footer.
- Move the insertion point to the blank line below the letterhead and press Enter three times. Ensure the alignment is set to align left.
- Using Insert Date & Time, insert the date using the third date format and press Enter four times. Insert Date &Time is located under the Insert tab, Text Group, Date & Time.
- Type the following address pressing Enter after each line, except the last line:
Mr. Stephen Shell, Human Resources Manager
MBIM
352 Crosslove Way
Borderline, KY 40505
- Right click on the word Crosslove. Choose the first option to correct the word to Cross Love.
- Select the entire inside address. Change the Spacing After for the inside address to 0, and remove the space before the paragraph if necessary.
- After the ZIP code, press Enter two times.
- Type Dear Mr. Shell: and press Enter two times.
- Type exactly as shown:
I am writing to express my interest in a position at your company. My enclosed resume details specific information regarding my background.
- Press Enter two times.
- Using the Text From File command, insert the text from the Text_Word_Practice_4 file. Remove the extra enters, there should no enters under the inserted text.
- Press Enter two times and type:
Sincerely, [press Enter four times]
Matt Smith

-
-
-
-
-
-
-
-
-
- Select everything from directly below the letterhead through the end of the document and change the spacing after to 0.
- Position the insertion point at the beginning of the document. On the Home Tab, in the Editing Group, choose Find. The Navigation Pane will open on the left hand side.
- In the search document box, type background and hit Enter. Notice how this word is now highlighted in your document, and a preview displays below in results.
-
-
-
-
-
-
-
-
- Click the arrow next to the search document box, and click replace. The Find and Replace dialog box will appear. In the Replace with box type experience. Replace the first instance, and then close the dialog box.
- In the paragraph that begins As shown on, select and drag the word skills to the right of the word unique. Use the drag and drop technique by selecting the text, holding down the mouse or cursor and moving the text to the new location.
- In the paragraph that begins with You can contact, drag the first sentence to the end of the paragraph. Use the drag and drop technique by selecting the text, holding down the mouse or cursor and moving the text to the new location.
- Position the insertion point in the blank paragraph above the paragraph beginning with I learn quickly.
- Press enter once.
- On the Insert tab, Tables Group, Insert a 2 x 3 table.
- In the first cell of the table, type Communication Skills.
- Press Tab and type the following, skipping the text typed above, information:
|
Communication Skills |
Excellent Listener, Stress Management and Emotion Control |
|
Technical Skills |
Operating Systems, Applications, Networking |
|
Education |
Bachelor of Science |
- Ensure the table is selected. Autofit the contents of the table on the Table Tools Layout tab, in the cell size group choose Autofit, contents.
- On the Table Tools Design tab, on the Table Styles group, Apply the Grid Table 4 – Accent 2 table style. Ensure the Header Row check box is not checked.
- Center the table between margins.
- On the Review tab, in the Proofing group, choose Spelling & Grammar.
- Beginning at the top of the document, perform a spelling and grammar check, correcting all errors. Ignore Spelling errors related to names. Delete any repeated words.
- In the paragraph that begins As shown on, use the Thesaurus to change shown to presented. Select the word Shown, right click and select synonyms. If the word presented does not display, launch the thesaurus for other options.
- Save your document and display backstage view.
- In Backstage view show all properties. Type cover letter in the Keywords box, your course name and section number in the Subject box and be sure your name is shown in the Author box.
- View the Print Preview in Backstage View. The document should fit to one page. If not, make adjustments to ensure your cover letter is one page. Compare your document to the image below.
- Submit the file for grading per your instructor’s instructions.
A letter of introduction that highlights key points in the resume that follows
The heading at the top of a sheet of letter paper that typically includes name and address or company logo.
The name and address of the person of business received the letter, positioned below the date line
Identifies spelling and grammatical errors and provides suggestions for correction
