PowerPoint Practice 2

Here is a video demonstrating the skills in this practice. Please note it does not exactly match the instructions:
Complete the following Practice Activity and submit your completed project.

We will continue to work with the PowerPoint presentation we started in PowerPoint Practice 1. You have been asked by the Occupational Dean to add additional content to the presentation regarding Peer Leadership and Fields of Interest at PVCC. Key skills in this practice include Reuse slides, deleting and moving slides, contiguous and non-contiguous slides, transitions, and animations.
- Start PowerPoint, notice how it opens in Backstage View. Under Open, browse to locate your PowerPoint_Practice_1, and select open.
- Select File, Save As, Browse, and then navigate to your PowerPoint folder on your flash drive or other location where you save your files. Name the presentation as Yourlastname_Yourfirstname_PowerPoint_Practice_2.
- There should be 5 slides in your slide deck. Ensure your presentation is in normal view.
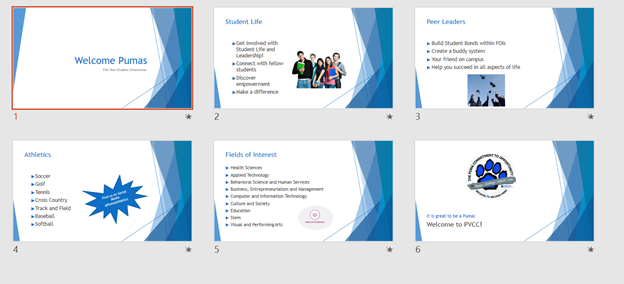
- With slide 3 selected, on the Home tab in the slides group, select New Slide and then Reuse Slides. In the Reuse slides pane, Browse File and navigate to your data files to locate the file PowerPoint_Practice_2 and select Open. In the Reuse slides pane, double click the first and second slide only to add to your presentation. Do not add the third slide, and do not check the box to keep source formatting. Close the Reuse Slides pane.
- On the View tab, in the Presentation View group, change the view from Normal to Slide Sorter. Change the zoom to about 50% so that all slides are shown on one page.
- Select slide 5, Peer Leaders, and move it to the slide 3 spot by clicking and holding down and dragging it to the slide 3 spot. Peer Leaders should be the new slide 3.
- Select slide 7, Any Questions, right click on the slide, and select delete slide. This will remove the slide from the slide deck.
- Select the noncontiguous slides, 1 and 6. To select two slides that are not next to each other, select the first slide, and ensure it is outlined in red to indicate it is selected. Then hold down the CTRL key and select slide 6. Then let go of the CTRL key. Both slide 1 and 6 should be outlined in red.
- With slide 1 and 6 selected, on the transitions tab, in the transitions to this slide group, select Fade under Subtle. Notice how slide 1 and 6 have a star next to them to indicate a transition has been applied.
- Select slide 4. In the lower right hand corner, select slide show view. In slide show, or presentation view, use the arrow on your keyboard, or mouse clicks to transition from slide to slide. Notice how the slides with the star, or transition, fade since a transition was applied. Press ESC on your keyboard to exit out of slide show view.
- On the view tab, in the Presentation Views group, select Normal.
- In the thumbnail pane, select slide 2. It should be outlined in red when selected. Hold the shift key on your keyboard and select slide 5. Let go of the shift key, and notice that slides 2, 3, 4, and 5 are all selected and outlined in red. Since these slides are contiguous, we use the shift key to select them.
- With slide 2, 3, 4, and 5 selected, on the transitions tab, select reveal transition under subtle. Notice how all slides in the thumbnail pane have a star next to them since they all have a transition applied.
- Select slide 1 so that it is the only active slide, and launch the slide show. Use the arrows on your keyboard to scroll through each slide in the slide deck, paying close attention to the transitions you just applied.
- Select slide 3, Peer Leaders. Select the text box with the bulleted list and ensure all of the text inside is selected. On the home tab, in the font group, use the Increase Font Size button to increase the size of the Font to 28. If necessary, un bold the text.
- With slide 3 still active, on the Insert tab, in the Images group, select Online Pictures. In the insert pictures dialog box, under the Bing Image Search type student leaders and then press enter. Choose any image you like that represents peer leadership at a college. Insert the image of your choice under the last bullet on slide 3. If necessary, resize the picture so that it fits on the slide without overlapping with the text.
- Select the image you just added. On the Animations tab, in the animation group, select the Fade entrance effect. Once the animation is applied, notice the number 1 appears next to the image to indicate this is the first animation that will play.
- On the Animations tab, in the advanced animation group, turn on the Animation Pane by clicking it one time. The Animation Pane will open on the right side of the screen. Click the down arrow next to the first animation, Picture 1 and select Effect Options. In the Fade dialog box, select the Effect tab, and under Sounds choose Applause. Click the speaker icon to hear the applause and ensure your volume is turned up, but not too loud. Select OK to hear the applause sounds you just applied. Close the Animation Pane.
- Select slide 5, Fields of Interest. Select the text box with the bulleted list, and change the font size of the text to 24. Move the text up slightly if necessary.
- On the Insert tab, Images group, select Pictures. Browse to where your data files are stored and locate the image PowerPoint_Practice_2_step20 and insert the image. Move the image so that it is in the white space to the right of Education, Stem and Visual and Performing Arts.
- With the image on slide 5 still selected, on the Picture Tools Format tab, in the Size group, select the arrow under Crop. Select Crop to Shape, and then select the Oval shape. Notice how the shape crops to an oval.
- With the shape still selected, ensure the height is about 1.8” and the width is about 2.6”. If necessary, adjust the size and location of the image so that it is not overlapping any of the text and fits in the white space to the right of the text.
- Save your presentation, and take note of where it is located. There should be a total of 6 slides in your slide deck. Compare your presentation to the image below, and make any modifications if needed. Close out of PowerPoint and submit your entire presentation per your instructor’s instructions.