Access Practice 2

Here is a video demonstrating the skills in this practice. Please note it does not exactly match the instructions:
Complete the following Practice Activity and submit your completed project.

For Access Practice 2, we will create an access database that manages student and faculty data in the Honors program at South Puget Sound Community College. For this practice, we will focus on creating the table structure for the database. Questions this database will answer are:
-
- How many students are enrolled in the honors program?
- How many students have declared Health Sciences as their Field of Interest?
- What students have been awarded a scholarship?
- What faculty teach in the Honors program?
- Open Access, and select Blank Desktop Database. You might have to click on new in the red left hand pane. Name the database Lastname_Firstname_Access_Practice2, and save it to your Access folder. Select Create.
- The database will open with a table named Table1 open in datasheet view. If it does not, you may need to select Create, then Table. We will use this table to track Student data in our database. Double click in the ID field and change the name to StudentID. Later you will change the data type.
- Click the down arrow next to Click to Add and choose Short text as the data type. Rename Field1 to Last Name and press Enter. Remember that in Access field names need to be precise.
- Click the arrow next to Click to Add and choose short text as the data type and type First Name and press Enter.
- Choose short text as the next data type, and type Field of Interest and press Enter. Continue to add the following fields and Data Type to the Table.
| Field |
Data Type
|
|---|---|
| Short Text | |
| Graduation Year | Short Text |
| Faculty ID | Number |
| Scholarship | Yes/No |
- On the Home tab, under Views, change the View of the table to Design View. When prompted, save the table as Students.
- In design view, change the ID field to StudentID, and change the Data Type to Number.
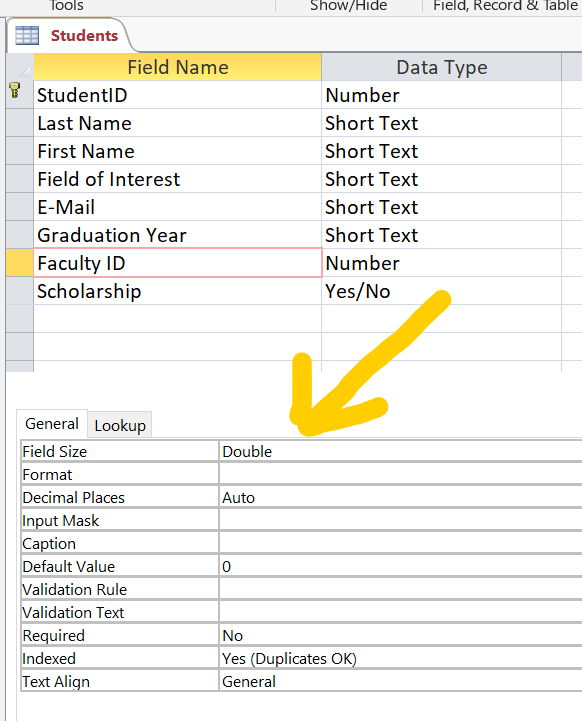
- Verify the Field Name and Data Type are entered exactly like this:

- Save and close the Students Table.
- Importing data into a table is a quick and easy way to populate a table with data. On the External Data tab, under the Import & Link group, select Excel. You may need to select New Data Source, from file, Excel. In the Get External Data – Excel Spreadsheet Dialog Box, under file Name, select Browse to locate the Import_Access_Practice2 Excel file. This should be saved where you save your data files downloaded from Canvas.
- Ensure to Append a copy of the record to the table Students is selected and select OK.

- The Import Spreadsheet Wizard should appear on your screen. If it does not, go back to your database window and ensure all database objects are closed. When running an import, tables and other database objects must be closed.
- On the Import Spreadsheet Wizard, select the check box next to First Row Contains Column Headings. If this is grayed out, ensure it is checked. Take a moment to preview the data that will be imported into the Students table. Then, select Next.
- On the next screen, ensure the Import to Table shows Students. Do not check the box next to ‘I would like a wizard to analyze my table after importing the data’. Once the import runs, it is not necessary to save the import steps, as we will not be running this import again.
- If your import was successful, go to step 18. If you received errors, try the following:
- If you receive an error message, such as the image below, that says a field does not exist, close the import. Open your Students table, and compare your field names and data types to the image in step 7. Your table fields must be in this order, and be spelled exactly the same. If your field names do not match the expected headers in your excel import file, the import will fail.
- If you receive an error message that says the import can not be completed, ensure all database objects are closed. Before an import can successfully run, all database objects must be closed.
- If you receive an error message that says your database is in use by another user, close the import. Ensure all database objects are closed. Save the database, and take note of where your database is saved. Close Access. If possible, restart your computer, and then open your database and try the import again.

- To verify the import ran successfully, double click the Students table to open it from the navigation pane. Verify there are 38 records in the table.

- Close the Students Table and ensure all database objects are closed.
- On the External Data tab, in the Import & Link group, select Excel.
- In the Get External Data – Excel Spreadsheet dialog box next to File name, browse to find the file Import2_Access_Practice2. This should be saved in your data files folder.
- Choose the first option, Import the source data into a new table in the current database and the select OK.
- On the Import Spreadsheet Wizard, check the box next to First Row Contains Column Headings.
- Take a moment to preview the data that will be imported, but do not make any changes. Select Next.
- Take a moment to look at the next screen, but do not make any changes. Select Next.
- On the next screen, select Choose my own primary key and ensure Faculty ID displays here. Select Next.
- Under Import to Table, type Faculty for the table name and then select Finish. Do not check the box next to ‘I would like a wizard to analyze my table after importing the data’. It is not necessary to save the import steps.
- In the navigation pane, right click the Faculty table to open it in Design View. Select the Faculty ID field. Ensure the Data Type is set to Number. Under Field Properties, ensure the Field Size is set to Double.
- With the Faculty table still open, select the Faculty ID field. Notice how there is a little key next to it, and on the Table Tools Design Tab, in the Tools group, Primary Key is selected. This indicates this field is the primary key. This is a required field in the table that uniquely identifies a record. Save and close the faculty table.
- Open the Students table in Design View. Notice that StudentID is the primary key. Select the Faculty ID field and ensure the Data Type is set to Number. Under Field Properties, ensure the Field Size is set to Double. Save and close the Students table.

- Ensure all database objects are closed. On the database tools tab, in the relationships group double click Relationships. In the Show Table dialog box, on the Tables tab, double click Faculty to add the table. The double click students to add the table. Close the Show table dialog box.
- In the Relationships window, ensure the Faculty table is first, and the Students table is second. You can resize and move the tables if you would like. This is helpful so that you can see all of the fields in the table.
- Notice on the Faculty table, the Faculty ID is the primary key. Click and hold the Faculty ID field on the Faculty table, and drag it to meet the Faculty ID field on the Students table. This will create a relationship between the two tables. This is what makes this Access database a relational database.
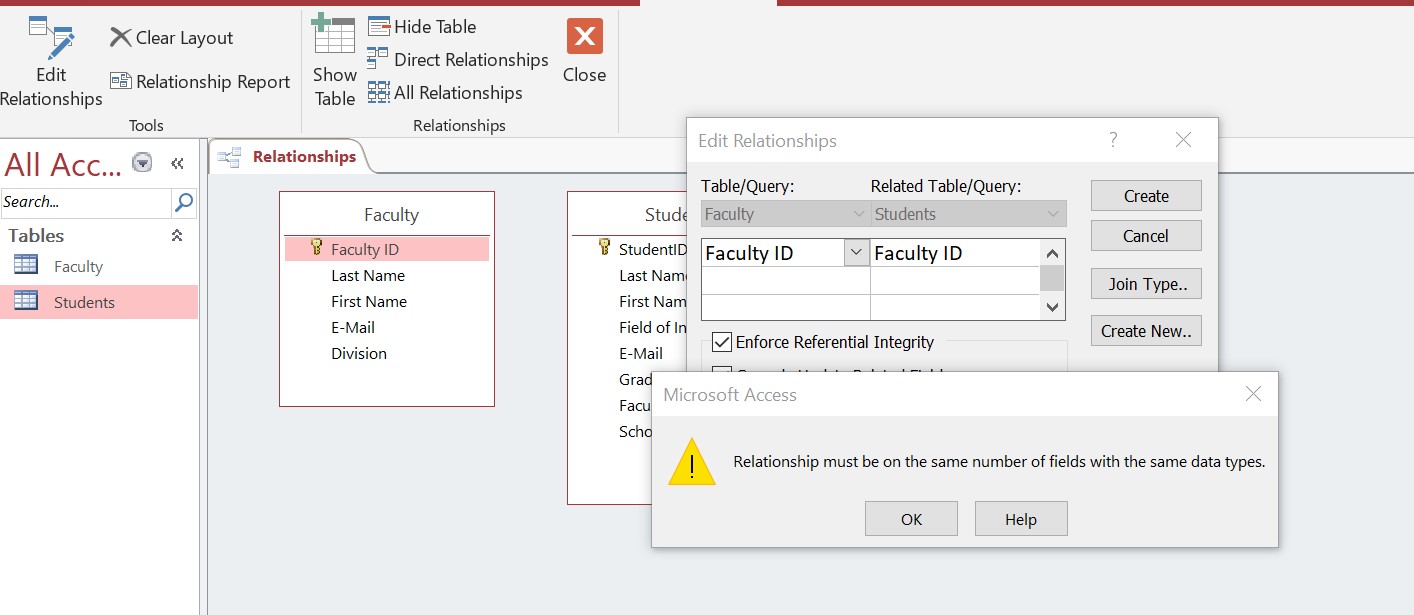
- If you get an error message stating “Relationship must be on the same number of fields with the same data types”, you have not set the properties field correctly in the two tables. The faculty ID fields must be exactly the same for the relationship to work. See step 29 and 30 on how to set those field properties.

- In the Edit Relationships dialog box, ensure the Faculty ID from the Faculty table displays and Faculty ID from the Students table displays. Check all boxes including Enforce Referential Integrity, Cascade Update Related Fields, and Cascade Delete Related Records. Notice the relationship type is One-To-Many. Select Create to create the relationship.
- In the Relationships window, the line connecting the two tables is called the Join Line. Double click the join line to view the Edit Relationships window. Select OK to close the window. Close the relationships window. If prompted to save, click Yes.
- In the navigation pane, ensure all database objects are displayed. You should see two tables, the Faculty table and the Students table. It is important that these tables are created, as we will use them in Practice 3.
- To exit out of the database, first close any database objects that are open. Select the File tab, and take note of where your database is saved. Then select close. Then, exit out of Access.
- Submit your entire database for grading per your instructor’s instructions.

