3 Advanced – Power Tools and Macros
Excel Power Tools
Get & Transform (formerly called Power Query)
The Get & Transform commands enable you to extract, connect, refine, and transform large amounts of data into an accessible Excel file. You can use Get & Transform to exert greater control over columns, formulas, and filtering tools, and also to modify data types and extract PivotTables.
Power Pivot
Power Pivot enables you to import and compare large amounts of data from multiple sources to analyze relationships between tables of data. You can use Power Pivot to create and model data tables, feed data to other Power Tools, and use data analysis expressions. Power Pivot is not available with all versions of Excel.
Power View
Power View is an interactive visualization tool used to provide a drag-and-drop interface for rapid model building. You can use Power View to connect to different data models within the same workbook, create new relationships among current data, and introduce key performance indicators (KPIs) based on those relationships. Power View can group (or smart group) data automatically to create advanced pie charts, maps, data cards, and other data visualizations.
3D Maps (formerly called Power Map)
3D Maps let you plot and visualize geographic or temporal data on a three-dimensional map. With filtering, you can compare how different factors affect your data. You can use a 3D Map to build custom regions, capture screenshots, and build cinematic time tours or animations through your data.
Power BI
Power BI, or Power Business Intelligence, is an Excel-based cloud tool that combines the other Power Tools with some additional features to enable you to find and visualize data, share, and collaborate. Power BI includes a wide range of forecasting tools, a drag-and-drop canvas, dashboards, report generation, and data modelling. Currently Power BI is available only to businesses, Office 365 subscribers, or as a download.
These Power Tools can be found by using the help feature or by visiting the Microsoft (c) website and searching for each of these tools. They should be available to you if you’re using Excel, but might not be readily available if you are using a Mac, Chromebook or Office 365.
In addition to using Excel power tools, you will create hyperlinks to move quickly to other parts of the workbook, animations, and external websites. You also will record a macro to automate a task.
Creating a hyperlink to a new file
-
On a worksheet, click the cell where you want to create a link.
You can also select an object, such as a picture or an element in a chart, that you want to use to represent the link.
- On the Insert tab, in the Links group, click Link
 .
.
You can also right-click the cell or graphic and then click Link on the shortcut menu, or you can press Ctrl+K.
- Under Link to, click Create New Document.
- In the Name of new document box, type a name for the new file.
Tip: To specify a location other than the one shown under Full path, you can type the new location preceding the name in the Name of new document box, or you can click Change
-
to select the location that you want and then click OK.
- Under When to edit, click Edit the new document later or Edit the new document now to specify when you want to open the new file for editing.
- In the Text to display box, type the text that you want to use to represent the link.
- To display helpful information when you rest the pointer on the link, click ScreenTip, type the text that you want in the ScreenTip text box, and then click OK.
Create a link to an existing workbook or cell
To link to a location in the current workbook or another workbook, you can either define a name for the destination cells or use a cell reference.
- To use a name, you must name the destination cells in the destination workbook.How to name a cell or a range of cells
- Select the cell, range of cells, or nonadjacent selections that you want to name.
- Click the Name box at the left end of the formula bar
 .
.
 Name box
- In the Name box, type the name for the cells, and then press Enter.
Note: Names can’t contain spaces and must begin with a letter.
-
On a worksheet of the source workbook, click the cell where you want to create a link.
You can also select an object, such as a picture or an element in a chart, that you want to use to represent the link.
- On the Insert tab, in the Links group, click Link .
You can also right-click the cell or object and then click Link on the shortcut menu, or you can press Ctrl+K.
- Under Link to, do one of the following:
- To link to a location in your current workbook, click Place in This Document.
- To link to a location in another workbook, click Existing File or Web Page, locate and select the workbook that you want to link to, and then click Bookmark.
- Do one of the following:
- In the Or select a place in this document box, under Cell Reference, click the worksheet that you want to link to,
-
- In the Text to display box, type the text that you want to use to represent the link.
- To display helpful information when you rest the pointer on the link, click ScreenTip, type the text that you want in the ScreenTip text box, and then click OK.
Quick start: Create a macro
Excel for Microsoft 365 Excel for Microsoft 365 for Mac Excel 2019 Excel 2016
If you have tasks in Microsoft Excel that you do repeatedly, you can record a macro to automate those tasks. A macro is an action or a set of actions that you can run as many times as you want. When you create a macro, you are recording your mouse clicks and keystrokes. After you create a macro, you can edit it to make minor changes to the way it works.Suppose that every month, you create a report for your accounting manager. You want to format the names of the customers with overdue accounts in red, and also apply bold formatting. You can create and then run a macro that quickly applies these formatting changes to the cells you select.Before you record a macroMacros and VBA tools can be found on the Developer tab, which is hidden by default, so the first step is to enable it. For more information, see Show the Developer tab. Record a macro
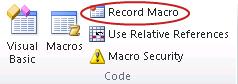
- In the Code group on the Developer tab, click Record Macro.
- Optionally, enter a name for the macro in the Macro name box, enter a shortcut key in the Shortcut key box, and a description in the Description box, and then click OK to start recording.
-
Perform the actions you want to automate, such as entering boilerplate text or filling down a column of data.
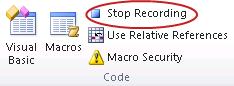
- On the Developer tab, click Stop Recording.
 Take a closer look at the macroYou can learn a little about the Visual Basic programming language by editing a macro.To edit a macro, in the Code group on the Developer tab, click Macros, select the name of the macro, and click Edit. This starts the Visual Basic Editor.See how the actions that you recorded appear as code. Some of the code will probably be clear to you, and some of it may be a little mysterious.Experiment with the code, close the Visual Basic Editor, and run your macro again. This time, see if anything different happens!
Complete these exercises and turn in according to instructions provided in your LMS.
- Find each of the Power Tools – Get and Transform, Power Pivot, Power View, 3D Maps, and Power BI. Investigate each by opening the homework 3.5 assignment and applying each of these power tools to your work. Which one would you be most inclined to use in your work and why?
- Reopen your finished 3.5 assignment. Add a hyperlink column to your 3.5 assignment.
- After investigating the Power Tools, use one of them in your homework 3.5 assignment, converting at least one column or adding one of these power tools to your workbook. Save the revised workbook with the power tool and hyperlink added as 3.5B and turn it in where directed by your instructor.
- Reopen your homework 3.5 assignment a second time and now apply a macro to it that converts the first column of data to the color purple (any shade of purple is fine). Save it as 3.5C and turn it in where directed by your instructor.